Course material for the advanced course
General information
In this document you will find all the information for the advanced course. This material is an addition to the theory of the toprope and seconding course, which will not be repeated in this document.
The admission criteria are that you are able to climb at least three routes relatively easy on the concrete wall. You can follow this course if you are either a seconding climber.
What to expect
This course will take up either three of four evenings, depending on your skill level. It takes 2 evenings practice and 1 evening exam.
Information in addition to the NKBV booklet
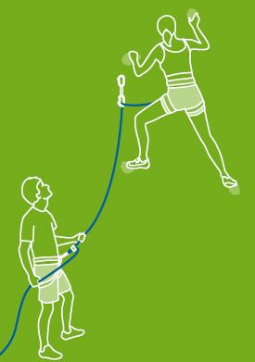
Belaying a seconding climber
After making his own belay, the lead climber wants to make a belay for the seconding climber so he can also reach the top. At the TSAC we use two methods for this, belaying with an HMS (Halbmastwurfsicherung) and belaying with an ATC-Guide. In this course we will only use the HMS for belaying, belaying with an ATC-Guide is only allowed by a ZK-SC or higher and will therefore be treated in the ZK-SC course.

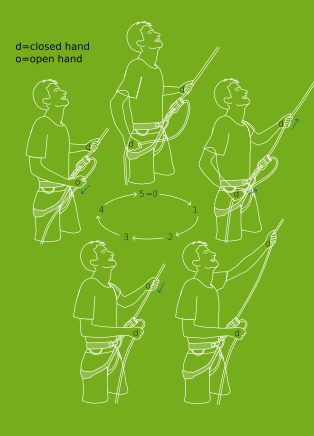
Belaying using an HMS
Belaying a seconding climber with an HMS is simple. The image on the right shows how the knot is tied in this situation. It is a sliding knot, as the climber ascents the rope can be taken in.
Converting to Toprope
In addition to the NKBV booklet there is another way to hang out a toprope after having lead climbed. On the artificial wall you can simply put the rope through the top karabiner (and secure it). On the concrete wall prefab relais are hanging, you are not allowed to open these karabiners. To hang out a toprope you first secure yourself, but don’t give the command "stand", since you want to be lowered later on. Now take in additional rope and put it through the karabiners. Tie a figure-eight knot in the loop and tie yourself in with a safebiner or two screw karabiners in opposite direction. Untie your original figure-eight knot and ask to be lowered (bloc beforehand).
When lowering you can clean up the quickdraws by first clipping them from the wall to your harness before unclipping them from the rope. The exception to this is the lowest quickdraw, this one we first unclip from the rope to prevent it from sliding down and hitting the belayer. We lowering you can also clip a quickdraw from the wall to your harness and leave it attached to the rope to keep yourself in the route. Lastly, make sure the other end of the rope has a knot in it or is tied to the belayer to avoid dangerous situations.
NKBV information Indoor Lead Climbing
De NKBV heeft een course material as well, which is obligatory for the advanced course as well. Since it is in English we have translated the most important parts for you below.
Risks and safety
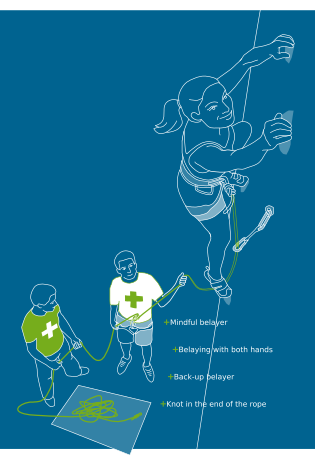
In lead climbing there are more risks than in toproping and the dangers are much graver. The techniques are more complex and demand constant awareness. Not paying attention for a moment can cause an accident. As the belayer it’s not just your responsibility to belay well but also to be an extra pair of eyes for your climber: give directions and point out (possible) errors. In climbing responsibility is always shared. It is always important to communicate to your partner what you are going to do.
Always pay attention to your surroundings and the rules of the climbing location. Also, make sure to tell other climbers if you see them make a mistake. Make sure that you always feel comfortable before climbing or belaying. If not ask an instructor for help or a skill update.
Climber and belayer
In lead climbing weight difference is of even more importance, in an ideal situation the belayer and climber are the same weight. Make sure the belayer is at least 70% of the weight of the lead climber.
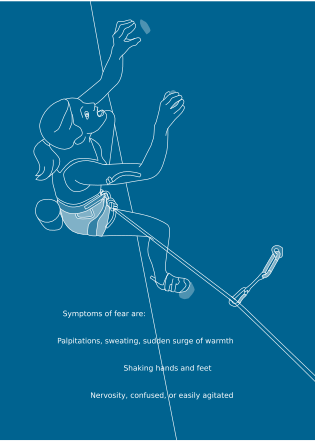
Handling Fear
In climbing, especially lead, fear is common. It is an inevitable and useful signal that enhances your focus. You’ll increase your self-esteem, safety and enjoyment if you learn how to handle your fear.
Fear can occur before you even start your route. You could try a mental warm up or talk about the route with your belayer. Try to rationalize the fear. What is reasonable and what is not?
Accidents
In case of an accident make sure to directly warn the “Zaalwacht” or the equivalent of the sportcenter you are at, even when it does not seem severe. The wounded should remain in the same position until help arrives.
Flaking the rope
Flake the rope in an area with enough room near the climbing route. Not where you are going to stand as belayer of course! Lay it out in large loops free of knots and hitches from bottom (end of rope with the knot) to top. The climber can tie himself in at the top end of the rope.
The belayer attaches the belay device onto the rope about 2.5 meters behind the lead climber.
Check? check!
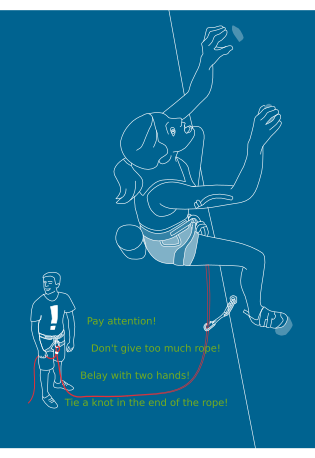
Always check your partner before climbing! A quick list of things that need to be in order before you start climbing:
- No one else is climbing the route
- Harnesses are put on correctly
- Belay device is correctly attached
- All karabiners are closed
- Knots are tied neatly
- Rope is flaked
- Knot in the end of the rope
- Climbers have read the route
- Rope is long enough for the route
- Know where to clip the rope
- There are enough places to place quickdraws
- You brought enough quickdraws
- Know what anchor there is at the top
- Have sufficient additional gear
Rope commands
Rope commands always start with the name of the person you are addressing.
At the TSAC we have the following rope commands, these are mainly in Dutch.
| Command | Meaning |
|---|---|
| Check?<-> Check! | before you go climbing, a confirmation of having done the checklist [from belayer to climber and climber to belayer] |
| Touw uit | give some rope, the climber needs some extra rope. [from climber to belayer] |
| Bloc | take in all the slack and support the climber. [from climber to belayer] |
| Bloc oké | letting the climber know the belayer is ready to support the climbers weight [from belayer to climber] |
For example, Charlie and Truus are climbing, Truus leads and Charlie seconds. Truus: ‘’Charlie, check?’’
Charlie: “Truus, check!’’ [Truus starts her climb]
Truus: “Charlie, touw’’ [Charlie gives rope]
Belaying a lead climber
Spotting a lead climber
Spotting is done before the first quickdraw is clipped. The purpose of spotting is to make sure the lead climber hits the ground with his feet first in case of a fall. To do so you redirect the falling climber to the ground at his hips (note, you redirect the climber, not catch!). If the climber is in overhang and so more horizontally placed, redirect the climbers from the armpits.
Whilst spotting make sure you have your thumbs parallel to your fingers, not spread out!
Stand behind the line of fall of a climber.
You can stop spotting and start belaying after the climber has clipped his first quickdraw.
Belaying
Position yourself in a manner that:
- You can easily see the first quickdraw
- YoYou can easily see the first quickdraw You are not in the line of fall of the climber You can easily see the climberu are not in the line of fall of the climber
- You can easily see the climber
- The climber is not obstructed by the rope
- You are close to the wall
- Your stance is stable (one feet forward)
- Always have a secured hand on the breaking end of the rope
Giving rope
This is a cycle, just like taking rope (from the toprope course).
Step 0: Place one hand just above the belay device. Place the other hand (breaking hand) secured onto the breaking end of the rope.
Step 1: Use your top hand to pull the rope through the belaying device. Meanwhile use your breaking hand to feed rope to the belaying device.
Step 2: Stop before your breaking hand gets too close to the belay device.
Step 3: Slide your tophand back to just above the belay device.
Step 4: Slide your breaking hand downward, keep enclosing the rope whilst doing this!
Step 5: Secure the rope with your breaking hand and repeat the cycle.
To quickly give some extra rope you can also step forward. Take in any excess rope if needed.
Leadclimbing fall
At a leadclimbing falls are more forces involved compared to toprope falls. At almost all cases you can see the lead climber when climbing indoors. If correct, you shouldn’t have any unexpected falls because the belayer is paying attention to the lead climber. When the lead climber expect to be falling soon, he/she should always warn the belayer.
When you expect a fall from the lead climber, you should stand in an active belaying position with your belaying hand with strait arm around the braking rope. By setting one step forwards or letting the lead climber pull a little bit of rope while falling you can improve the catch. Remember that when you get pulled to the wall that you don’t release the rope. Try to pay attention to the obstacles while belaying and make sure the lead climber doesn’t hit the obstacles while falling by estimating there falling position.
Lowering the lead climber
When the lead climber attached the rope to the top anker and wants to go down, you should pull the rope tight and hold the belaying rope with two hands. Lower the belayer slowly in a controlled way with the thumbs around the rope. Lower the lead climber in such way that he/she can remove the quick draws easily when nessasary. When the lead climber wants to go down before reaching the anker point, leave the quick draws inside the wall for their safety.
Retrieving the rope
When you are done and there are no materials left at the top you can retrieve the rope in the following way:
- Remove knots from the rope.
- Pull the rope down starting at the end where it was attached to the climber, so you are pulling the longest end.
- Before the rope falls down make sure to warn other people by shouting "Pas op, touw!" (watch out, rope!)
- If you have a rope bag, make sure the ends of the rope are attached to the side of the rope bag. This makes sure that no knots are created while traveling.
Leadclimbing
Placing and clipping quickdraws
In many climbing centres quickdraws are already hanging in the wall. If not, you have to hang in the quickdraws yourself in the metal bolts. The best moment to clip a quickdraw is when you're standing firmly and the bolt is at waist-height. Don't try to overreach when clipping, this could create an imbalance a cause you to fall.
All quickdraws usually have a fixed snapper, for the rope end, and a loose snapper for the bolt end, this creates a cleaner line for rope. Make sure you always use the same end for clipping the bolts and the rope, over time the bolt end will develop scratches (metal on metal) which could damage the rope.
If the route is going diagonal, the rope-end snapper of the quickdraw should face opposite of the climbing direction. Otherwise, if the climber falls the rope could unclip itself.
One of the most crucial moments during lead climbing is when you have to clip the rope into the quickdraw. As you prepare to clip, you take out extra rope; should you fall in that moment, you’ll not only fall twice (!) the length to your last quickdraw but also the extra length you’ve taken out. There you should never clip a high hanging quickdraw.
When clipping in the rope, always make sure the rope goes in from the back and comes out of the front. Otherwise, when falling, the loop of rope created during a fall can hit the gate and the rope can unclip itself (backclipping).

Feet mistakes
During leadclimbing the rope must never be behind your leg or feet. When you fall this can cause the rope to get caught behind your feet, causing you to turn and fall head first. Therefor make sure the rope goes strait between legs for a vertical route. For a skew route let the rope go over your thigh.
Rope development
The rope must not make sharp turns though the quickdraws. This causes a lot of friction which makes for example attaching new quickdraws hard. For sharp turns in the route or overhang use a quickdraw with a large schlinge.
Lead climbing fall
During a lead climbing fall every part of the belaying chain has a part in absorbing the shock. For the climber the optimal stance during a lead climbing fall is being slightly bend over with one hand on the rope close to your knot. You use your other arm to keep your balance; lightly bend, upwards and to the side. Keep your legs spread with bend knees and with your soles towards the wall.
Optionally you can push yourself from the wall so you don’t hit grips. Never push yourself too hard because this will cause a uncontrolled collision with the wall. When approaching the wall, you can absorb the shock by bending your knees. Use your hands to stabilize.
CAUTION: reaching to a quickdraw or the rope of the belayer is pointless and dangerous!

Reaching the top
When reaching the top, you attach the rope to the turnover point. This point differs per climbing location but needs at least to consist of a safebiner or two opposed normal carabiners. Make sure the carabiners are closed. It is recommended to use a back-up for example by leaving the rope in the top most quickdraw or add an extra quickdraw next to the hook of the turning point. A backup is useful if the rope would accidentally get out of the turning point.
Coming down
If you used your own quickdraws your belayer must brake at every quickdraw so you can retrieve it. If the quickdraws where already attached to the wall, you can leave them hanging and just disattach them from the rope. When you are down you can retrieve the rope or other people can toprope. If you want to go down before you reach the top you don’t disattach your quickdraws so you don’t have to descent on one quickdraw. This means you have to retrieve your quickdraws in another way.