Course material for the seconding course
General information
In this document you will find all the information for the seconding course. This material is an addition to the theory of the toprope course, which will not be repeated in this document.
What to expect
The seconding course will take up three evenings. On the final evening you will have to take both a theoretical and a practical exam. The theoretical exam will cover both the theory of the toprope course and the theory of the seconding course.
Material
Karabiner
The name “karabiner” comes from the German word Karabinerhaken, i.e. a type of hook originally used to attach a carbine rifle to the belt. A karabiner is a metal loop with on one side a spring-loaded gate, also called a snapper. Karabiners form the connection between two ropes, a rope and a bolt or a harness and an ATC. In short, it is a very versatile piece of equipment to connect anything with everything. There are roughly three types of karabiners, each designed for a specific purpose: snappers, screw-lock karabiners and HMS karabiners.
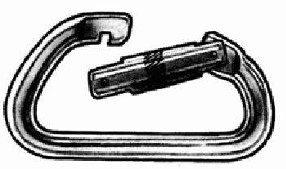
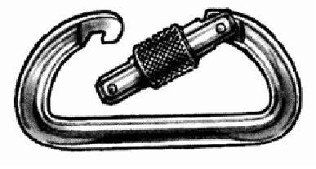
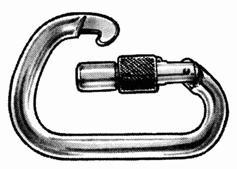
| snapper karabiner | screw-lock karabiner | HMS karabiner |
|---|---|---|
 |
 |
 |
| A snapper karabiner is the simplest type. The karabiner kan be opened easily and sometimes clipped in rope can unclip itself. Therefore this karabiner is less secure and it is only used in non-critical situations. It is however an excellent material karabiner (to hang all your unused crap on your harnass). It also forms part of a quickdraw which lead climbers use for temporary anchorpoints. |
The screw-lock karabiner has an extra safety so the snapper can't accidently open itself. The karabiner is locked with a screwing mechanism: thus the screw should always be screwed tight. This should always be checked during use! Don't screw the gate incredibly tight though, otherwise you will never get it open again. Closing the screw until it is just tight is enough. |
The HMS karabiner is a special type of screw-lock karabiner. It has a large pear-shaped form. Only in this karabiner the Munter hitch will function properly. Because the Munter hitch is called HMS in German, we call this an HMS karabiner. Again, always close the screw. |
Sling
A sling is a stitched (or tied) loop of webbing, also called a schlinge. Contrary to normal rope, webbing is flat and very flexible. This makes the sling very strong. At the TSAC we use two sizes: 60cm and 120cm.
Hitches
Munter hitch or HMS
The Munter hitch or HMS (Halb Mastwurf Sicherung) is a dynamic, non-jamming hitch. This means you can’t fixate something with it but you can use it to brake or to belay somebody.
The Munter hitch can only be used with an HMS karabiner, in any other type of karabiner the knot will jam. The figure to the left shows an HMS used as a belaying "device".
The HMS creates a lot of friction between the climbing rope and the karabiner. This causes the force exercised on the rope to be transferred almost completely to the karabiner (which in turn transfers it to your harness or anchor).

Clove hitch
The clove hitch is, contrary to the Munter hitch, a jamming hitch with which the main rope can be attached to the karabiner. It is not necessary to use an HMS karabiner but make sure you use a screw-lock karabiner!
The figure to the left shows how to tie the knot (with one hand!). The beginning is similar to the HMS but the final turn contains an extra twist, causing the hitch to jam. Caution, if the final turn is twisted the wrong way it creates a girth hitch; while it may seem like this is a jamming hitch, it is not and therefore dangerous to use!
The clove hitch is used very often (especially in alpine techniques) because of its simplicity and reliability.
Prusik hitch

A prusik rope is a rope of about one meter in length and specifically meant to tie a prusik hitch with. This prusik hitch requires that the diameter of the prusik rope is about 5 or 6 mm in diameter.
The prusik hitch is perhaps the most difficult hitch in this course. It is a friction hitch and the expanded version of the girth hitch, but it has a different application. A prusik hitch is tied around the main rope and when loaded will grip the rope.
Make sure the windings are placed neatly beside each other. Moreover, the diameter of the prusik rope may not be more than half the diameter of the main rope, usually 5 or 6 mm will suffice. The ends of the prusik rope are most commonly tied together with an overhand bend to create a loop.
Belay-technique
The belayer should never be distracted, a small mistake can have fatal consequences!
Nowadays there are many different belay devices on the market, each with specific properties and specific instructions. To prevent confusion and improve the safety, the TSAC only allows two belaying methods: belaying with an HMS and belaying with a tube device.
Climbing a route, either in a climbing gym or outside, can be done in two ways: by top-roping or by lead climbing and seconding. Although these situations call for a different belay technique, there are two things one should always take into account:
- The belayer always has at least one hand on the breaking end of the rope.
- Don’t give the climber excessive slack, the climber could fall unnecessarily hard and far.
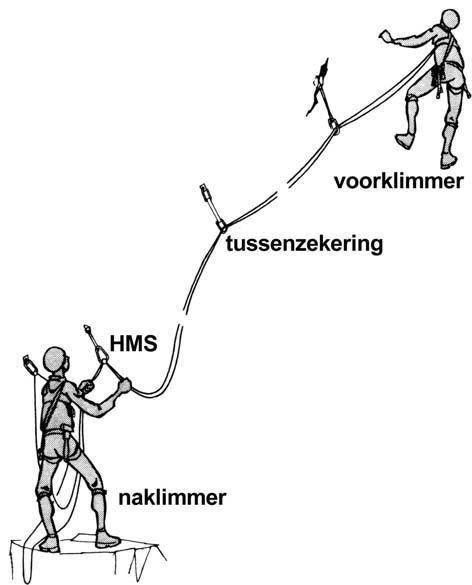
Lead climbing and seconding
Lead climbing and seconding calls for a different way of belaying. This is the technique used to climb (long) routes outside, because you can’t build a toprope beforehand. But also in climbing gyms this is a common way to climb routes.
The lead climber is the first ascending climber, he or she will climb the route using quickdraws (and aid gear) to reduce the fall distance. The lead climber is belayed by the seconding climber. When the lead climber reaches the anchor point, he will secure himself (stand) so he won’t have to be belayed by the seconding climber anymore. The lead climber can then start belaying the seconding climber so he or she can also reach the top.
Lead climbing is more thrilling than top-roping due to the greater falls you can make. Because of the greater falls, the forces are much greater as well. For this reason, you can opt to belay with a Munter Hitch. The Munter Hitch provides enough friction for belaying a lead climber in any circumstance and is therefore always a save choice. Tube devices can also be used to as well, but they have less friction making it harder to hold a fall. If a lead climber is to belayed over the anchor, always use a Munter Hitch.
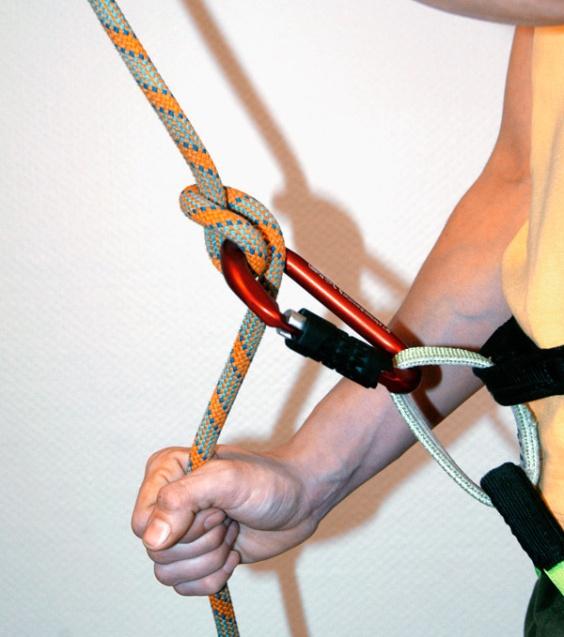
Either belay device can be attached to your harness or to the anchor point (as shown in the picture). Note however that belaying with a tube device of the anchor point requires a special setup not taught in this course.
Belaying is to be done actively, more so than with top-roping. The belayer should anticipate the movements of the lead climber, for example: give rope when the lead climber is going to clip a quickdraw.
Apart from the basic belaying rules there are a few additional things to take into account when belaying a lead climber:
- Again, don’t give the climber excessive slack. This is especially important with lead climbing as the climber doesn't want to fall farther than necessary. However, a little slack is preferable so you won't pull the climber out of the wall and the peak force won't be as large.
- Make sure you stand close to the wall whilst belaying, otherwise in case of a fall you will be pulled towards the wall instead of upwards.
- Do not stand in the fall line of the climber.
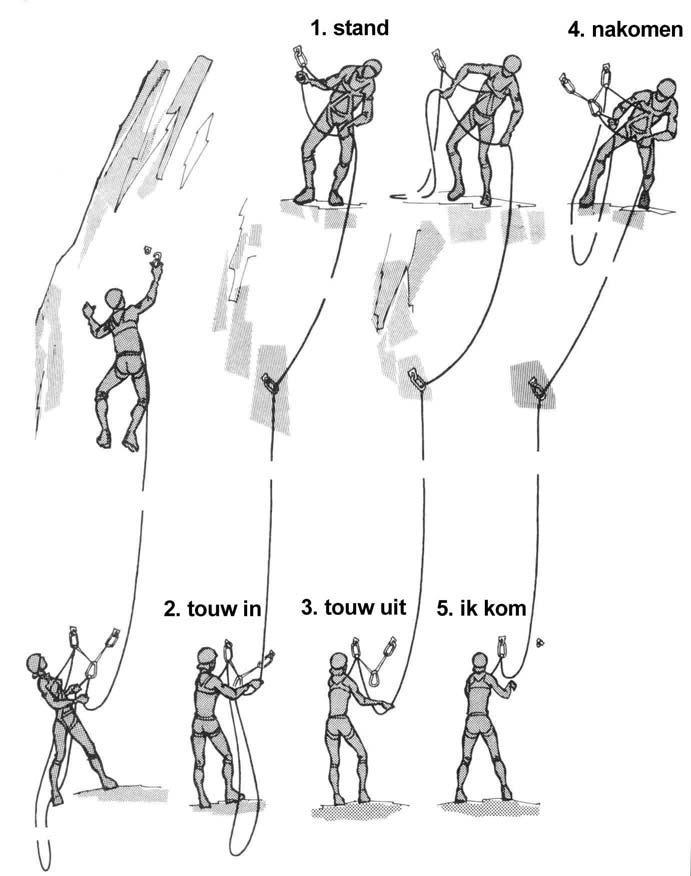
Rope commands
For the communication between the lead and seconding climber people have devised a few standard terms: the rope commands. Ever climber uses these commands and knows what they mean. This improves the safety as it prevents confusion during communication. It might sound a bit exaggerated but when climbing outside it is often difficult to hear or see each other. Using rope commands minimizes the chance of miscommunication.
Rope commands are often used to indicate a change in the belaying situation. The table below describes the rope commands used during the standard cycle of lead climbing en seconding, they are given in Dutch and should always be used in Dutch, even if it is not your native language.
| command | called by | situation / action |
|---|---|---|
| ik ga | Lead climber | The lead climber has check everything and announces that he is going to climb. |
| stand | Lead climber | The lead climber has reached the anchor point and made a self-belay. The seconding climber can undo his belay. |
| touw in | Seconding climber | The seconding climber requests excess rope to be taken in. |
| touw uit | Seconding climber | The excess rope has been taken in and the rope is tight. |
| nakomen | Lead climber | The lead climber has made a belay for the seconding climber and announces that the seconding climber can come up. |
| ik kom | Seconding climber | The seconding climber confirms he is starting to climb. |
Note: each command should be preceded by the name of the recipient.
Furthermore, we make use of the following commands:
| command | called by | situation / action |
|---|---|---|
| bloc | Climber | The belayer takes in rope until the rope is tight. The climber can know hang in the rope and rest without being lowered. |
| pas op, touw | Anybody | Warning for when a rope is being pulled out of a route or being thrown down. |
| touw vrij | Abseiler | The abseiling rope is free to use. |
Unclipping quickdraws
Unlike with top-roping, a seconding climber will encounter quickdraws on the way up, naturally you will have to take these with you. To make sure you don’t lose any material: first unclip the quickdraw from the bolt, then clip the same end to one of your gear loops before you unclip the quickdraw from the rope. If you climb in a group of 3 and you are the middle climber you can just unclip the quickdraw from the rope and clip it back on the rope below the point you are tied in, of course the last climber should take the quickdraw with him/her as described above.
Securing yourself
When you reach the top of a route you want to connect yourself to a secure point (usually the anchor point) so you don’t have to be belayed anymore. There are several ways to connect yourself to the anchor point, but always use a screw karabiner
- Making a clove hitch in the rope you are tied into. This is a fast and practical way. The length is easily adjustable. Because the self belay is made from dynamic rope you may fall in it; something which you may not do with a static sling.
- With a separate sling tied to your tie-in loop with a girth hitch. This method is preferable when you want to use the main rope to build an abseil.
Abseiling
Abseilen is German for rappelling. Naturally you abseil when you want to go down after climbing a route, but it is not always necessary to abseil. With toproping the belayer can simply lower the climber and in rock climbing areas you can often walk down via a (muddy and steep) path at the back of the wall.
Abseiling is relatively risky since you are only hanging on one point and the rope techniques are bit more difficult than in a belaying situation. Therefore you should always keep your concentration and work neatly.
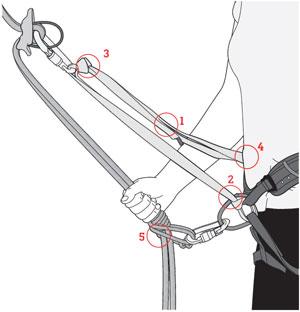
Every karabiner used is of course a screw-lock karabiner. The sling is attached to the belay loop with a girth hitch. It is recommended to use a long sling and to put an overhand knot at roughly a third of the length above the girth hitch. An ATC is connected with a screw-lock karabiner to the short loop of the sling (as shown in the image below). Your self-belay is clipped in the long loop of the sling; but, when you’ve attached your prusik to your belay loop with a second karabiner, you can attach it to one of your gear loops. Taller or shorter people may place the overhand knot a bit higher or lower than at a third of the length, ideally the ATC should be at chest-height. However, make sure that the prusik can’t hit the ATC. If this happens the ATC will move the prusik and it won’t brake anymore!
After a few tries you will get a feeling for what makes for a pleasant abseil. Pay attention to the following points:
- Keep both hands below the ATC. One hand only grabs the rope; this is your braking hand which decides the speed. With the other hand you slide the prusik hitch down.
- Try to descend at a continuous rate, holding your legs slightly apart for better stability. Lean back sufficiently enough for feet to be perpendicular to the wall.
- Watch out with long hair, sleeves, straps of your helmet e.t., these can get stuck in your ATC which can be a real problem. Often you will need to be rescued by someone else!
Until now we have assumed that the abseil rope was already in place. If this is not the case, you have to hang it out yourself. Do this carefully and keep in mind the following points:
- Always make a self-belay so you won’t fall down we hanging out an abseil.
- Normally you abseil over two strands so you can recover the rope from the ground. Tie the rope ends together using a figure-eight bend to prevent the ends from slipping through your device. Consequently, the prusik hitch will get caught on the bend if your abseil proves to be too short.